top of page
Sanane

PlayStyle: Long Range, Setup
Similar to: Billy Kane(KOF), Falke(SFV), Fei Long(SF4), Rolento(SF4)
Strengths: Great range and screen control on her stick specials and she is excellent at nullifying projectiles (including supers) from her opponent. She has an amazing hard attack, it's incredibly fast and long range. She has solid damage for one bar of meter on top of having great setplay and creativity with her Yayoitoukongi super. She has great normals all around and she has a incredibly fast movement. Her air to air conversions are also exceptional due to having an air super
Weaknesses: She lacks defensive options outside of super and a very situational counter in Gekkyoubotan that can be hit low or thrown. She is also somewhat dependent on meter for her true strength to shine. Sanane also has one of the slowest command overheads in the game with Touchuhoh (back + MP). She does low damage in comparison to the cast the more meter she spends so she'll have to go for setups to reset and catch the opponent.
Play if: + You like controlling the screen
+ You like using rekkas
+ You love setups and deep creativity
Avoid if: - You don't like mixups
- You don't like having no meterless wakeup option
- You don't like scarfs
Recommended Gougi Decks: Aggro, Stealth Raptor, Shinobi, Berserker, Juggernaut, Double Face, Infinity
Max Damage Punishes
Meterless: dash cr.MP > st.MK > cr.HP > LP Sanrenkon x2 > LP Tenshoukon (56 Damage)
1 Meter: dash cr.MP > st.MK > cr.HP > LP Sanrenkon x2 > LP Tenshoukon > Iza Yoirekkon (78 Damage)
2 Meter: dash cr.MP > st.MK > cr.HP > LP Sanrenkon x2 > LP Tenshoukon > Iza Yoirekkon > late cancel Yayoitoukongi (81 Damage)
3 Meter: dash cr.MP > st.MK > st.HK > Yayoitoukongi > early cancel Iza Yoirekkon > late cancel Yayoitoukongi (70 Damage)
Key Normals
Crouch Heavy Punch: Go to solid anti air and can easily combo into Yayoitoukongi for extra damage.
Stand Medium Kick: This is an excellent button to check dash in low with and to buffer into Sanrenkon to whiff punish or counter poke an opponent. Sanrenkon will always connect from any range.
Stand Medium Punch: This a unique anti air option. It hits twice and is better for stopping jumps just outside of the crouch heavy punch range. This normal is a bit slower than Hokuto/Shirase's but it can be a bit more useful in chains to catch opponents challenging.
Crouch Heavy Kick: While this sweep does have decent range, it is incredibly unsafe on block and doesn't really lead into anything. While it is good sometimes to catch opponents stand blocking a chain, use extreme caution. It can chain into her command normal overhead but it's very slow so it would rarely catch a player.
Stand Heavy Kick: This is your best heavy normal to use on block if you want to stay safe. You can hit confirm Stand Heavy Kick into her supers for more damage on hit. This can also be made more plus after a knockdown as a meaty giving you a free Crouch Light Kick into Crouch Medium Kick into SanrenKon.
Key Moves
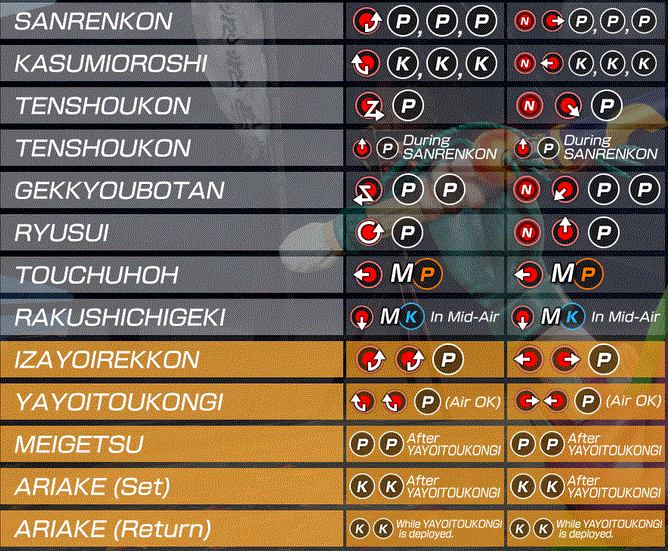
Sanrenkon: This is your main source of damage on a hit and it's going to be how you can start her mixup on block as well as you can mix using Kasumiorshi to mixup or Tenshoukon to end the rekka series safely. This is a very versatile special even though it seems a little basic on the surface. This special and Tenshoukon will nullify projectiles (even supers) and keep it's hitting properties even after it destroys a projectile.
Gekkyoubotan: Your standard counter that can be followed up with a super. Unlike Hokuto/Shirase this counter can be hit low however it can be grabbed like all counters. This isn't fast enough to be used on wakeup as a reversal but you can catch people if they try to stagger or poke you too predictably.
Yayoitoukongi: This move has so many options for set play. Regularly it travels across the screen like a normal projectile and in standard combos that works just fine. The deep aspect of this super is that it can be controlled much further. You can aim it by holding a direction after inputting the super, you can have it stay still by pressing two punch buttons together, and you can also drop the stick on the ground with 2 kick buttons at the same time. If you choose to drop the stick you can call it back with the same input as dropping it and it will start spinning in the spot that you dropped it allowing for deceptive/deadly setups and pressure.
Combo Examples
Chain Combo
Cr.LK, Cr.MK, Cr.HP, SanrenKon x 3, Yayoitoukongi
Link Combo
Cr.LK, Cr.MP x2, St.HK, Izayoirekkon
Tech
Kasumiorshi can be used to get some sneaky crossups
Guard Break is extremely dangerous during a blocked Yayoitoukongi
General Strategy
Sanane is best when she is controlling space with her stick specials and using her Yayoitoukongi super to attempt and set play the opponent. Knowing your options from her knockdowns is key for capitalizing on damage. She can be greatly rewarded depending on how Yayoitoukongi hits so always be ready to convert further. She can be played very straight forward as outside of Yayoitoukongi she is somewhat simple. But utilizing her full moveset is key to success with Sanane. Depending on your deck choice she can excel in the long range and force the opponent to take risks so be ready to punish accordingly. Be vary of guard cancel decks as the Sanrenkon can be punished if you are careless with it's usage and are too predictable with your choices on block.
Frame Data
Back to Darun or onto the swordsman Hayate


bottom of page